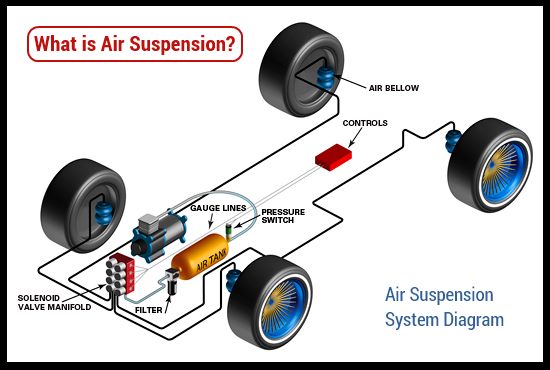
When looking to install an air suspension system, it is important to make sure that it is installed correctly and according to the best industry practices. This article will provide a detailed guide on how to install an air suspension system so that you can be sure that your installation job is done right the first time. We will cover everything from pre-installation prep work, choosing the right components, properly mounting the parts, connecting all of the pieces together, and finally testing and calibrating the entire system.
1 – Pre-Installation Prep Work
The first step in installing any kind of air suspension system is pre-installation preparation. This means making sure that you have all of the components before starting work. Check to make sure that you have all of the necessary hardware (nuts, bolts, clamps), brackets, and hoses. You should also check for any instructions or diagrams included with your kit as they may contain additional information on how to properly install certain parts of your system. Additionally, if you are unfamiliar with air suspension systems or unsure about what components are needed for your specific vehicle or application then it may be wise to consult with a professional or do some additional research beforehand.
2 – Choosing The Right Components
Once all of the prep work has been completed, it’s time to begin selecting the correct components for your particular setup. The type of vehicle you have and its weight distribution will determine which type of shocks and struts you need as well as their mounting locations and height adjustments when setting up an air suspension system. It’s important to be aware of any possible clearance issues when selecting components for your setup because this could impact where they can be mounted and whether they are suitable for your vehicle’s size/weight class or not. Additionally, some aftermarket components may require modifications for them to fit properly so make sure that these modifications can be done beforehand in order to save time during installation.
3 – Properly Mounting Parts
Once you’ve determined which shock absorbers and struts are right for your setup then it’s time to mount them into place. Before beginning this process it’s important to make sure that both sides are securely connected so there won’t be any shifting while driving on uneven terrain or during sharp turns/corners. Start by measuring out where each component should go (keeping in mind any clearance issues) before drilling holes into place – then bolt each part down securely using nuts/bolts/clamps as necessary. Once everything has been bolted down correctly then move onto connecting all of the pieces together such as tie rods, control arms, sway bars etc..
4 – Connecting All Of The Pieces Together
Now comes connecting all of the parts together via their associated hoses/lines from either side; start by routing each hose through its designated path (making sure not too have too many bends) before tightening each connection using pliers/wrenches etc.. Make sure all connections are secure before moving onto testing & calibration phase; also double check for any leaks coming from either side by spraying some lukewarm water over them (if no bubbles appear then everything should be good). Lastly fill up a shock absorber with required amount of oil & close its cap – repeat same process for remaining ones before moving onto next step!
5 – Testing And Calibrating The Entire System
The last step in setting up an air suspension is testing & calibration – this involves adjusting pressure levels according to manufacturer instructions in order ensure optimal performance (dependent on factors such as weight load etc.). Start by filling up tanks with desired amount of pressure (ensuring they don’t exceed recommended maximum levels) before turning switch “on” so air begins flowing through pipes towards shocks & struts; wait few seconds until pressures become equalized between both sides before giving car test drive around block! If pressures remain stable after few minutes THEN congratulations – installation job was successful!
Like us on Facebook!

